
This recipe is ridiculously easy and fast And yet I have still managed to screw it up... twice. I'll share my failures with you in hopes that you will be able to avoid my errors.
Ingredients:
1-2 cloves garlic
28 oz can of crushed or diced tomatoes
12 oz pasta (rigatoni or penne works best - we use whole wheat noodles)
1/2 cup cream (I use half and half - it's the lowest in fat and calories)
Optional toppings:
ground beef
fresh spinach
Use a large, deep saucepan.
Saute the garlic in olive oil over medium heat - cook until you can smell the garlic, but don't let it get brown.
(You could also saute some chopped onions at this point if you so desire.)
Add the can of tomatoes and 3 cups of water.
Salt.
Bring to a boil, and add the pasta.
Cover the pasta, and check it again in 12-15 minutes. You want the noodles to have absorbed a lot of the tomato sauce.
Add the cream, stir well.
At this point, you can turn off the heat and add the fresh spinach, stirring well, and let it wilt.
You can also brown some ground beef on the side and add it, but I haven't done this.
This is a super easy and delicious way to cook a big pot of pasta and tomato sauce!
Oh, and as promised, here are the moron mistakes I made:
- Be sure to actually saute the garlic before adding it. I forgot once, and tried to add the raw garlic later. Needless to say, it went poorly.
- Use crushed or diced tomatoes, NOT pureed. The sauce is fairly tasteless with pureed tomatoes.
- The cream is important - it really thickens up the sauce well.
Wednesday, March 24, 2010
It May Be Too Easy Even for the Flaming Toaster Dessert
I have never posted to a blog before and am excited to do so on one called The Flaming Toaster! The fact that it is a recipe blog is ironic since I have, in my culinary history, made frozen pizza without removing the cardboard tray, roasted a turkey with the baggie of innards still inside, and baked brownies that doubled as a paper weights.
So here it is, the super-easy, healthy, yet satisfying, all about presentation, yogurt parfait dessert!
Prep Time: Less than 5 minutes barring interruption or spills
Ingredients and Supplies:
Big container of vanilla yogurt (not fat-free, creamier the better)
Various berries (if you are feeling patriotic go for strawberries and blueberries)
Tall parfait glasses or any other tall, pretty glass (yes, I did register for these for reasons I cannot recall)
Long handled spoons
Fresh mint (optional, but a nice I’m-so-gourmet touch)
Cinnamon if you are so inclined
Steps:
1. Put 2 – 3 spoonfuls of yoghurt into tall glass
2. Put layer of strawberries
3. Put 2 – 3 spoonfuls of yoghurt in tall glass
4. Put layer of blueberries
5. Repeat until glass is full
6. Top with sprig of fresh mint (optional)
7. Sprinkle with cinnamon (if you like)
Monday, March 22, 2010
Ham Asparagus Strata
I was perusing my BHG cookbook for dinner ideas, and I suddenly remembered that Andrew and I both love breakfast for dinner. In fact, we have been known to parrot my dad's frequent comment whenever my mom made breakfast in the evenings: " I LOOOOOOOOOVE breakfast for dinner!" Anyway, I looked through the "eggs" section of the cookbook, and on the last page, I saw this "strata" thing. What in the heck is a strata? Well, according to Wikipedia, it's a layered casserole dish most commonly made with eggs, bread, and cheese. YUM! Plus, the prep time is only 25 minutes (perfect) and you actually MUST make it ahead of time (at least 2 hours if not an entire day ahead). So, I gave it a whirl, and this is now one of our favorite dishes. The first couple of times I made this strata, it turned out a teensy bit watery, so I modified the recipe a bit.
******
Prep: 25 minutes
Chill: 2 to 24 hours
Bake: 50 minutes
Oven: 325 degrees
4 whole-wheat English muffins, torn/cut into bite-sized pieces
1 cup (6 oz) cubed fully-cooked ham
1 cup (5-6 oz) asparagus cut into bite-sized pieces
6 oz swiss cheese (either grated or sliced & torn into small pieces)
4 beaten eggs
1 1/2 cups milk
1/2 cup sour cream
2 Tbsp finely chopped onion (or 1 tsp dried minced onion)
1 Tbsp Dijon-style mustard ("Pardon me sir....")
1/4 tsp caraway seeds
1/8 tsp pepper
1) In a greased 2-quart square casserole dish, create a layer of half of the English muffin pieces. Top with layers of the ham, asparagus, swiss cheese, and then spread the remaining English muffin pieces on the very top.
2) In a bowl, mix the eggs, milk, sour cream, onion, mustard, caraway seeds, and pepper. Pour evenly over top of the layers in the casserole dish.
3) Cover and chill in the fridge for at least 2 hours, but no longer than 24 hours.
3) Uncover the dish and bake for 50-55 minutes in a 325 degree oven or till a knife inserted near the center comes out clean. If you have reached an hour and the knife still doesn't come out clean, go ahead and take the dish out-- you're just stuck with slightly watery strata. It's still really yummy! Let is stand for 5 to 10 minutes before serving.
******
This theoretically makes 6 servings, but it's pretty heavy and a little goes a long way, so for once, this "yield" is pretty accurate, no matter how hungry you are! Leftover strata keeps really well in the fridge and is great either cold or re-heated.
Oh, by the way, the first time I made this, I somehow missed the part about the asparagus being cut up. I baked it with a layer of long asparagus spears. Not that it affected the taste in any way, but it was a bit hard to serve. WHOOPS!
Here's a picture of the strata I made two weekends ago for my in-laws, who were visiting from the Dallas-Fort Worth area:

The chef and her strata! (picture taken by my father-in-law)

On a related note, can someone else please tell me that they, too, didn't realize that ham came from a pig until way later than most people figure it out? I mean, ham bears no resemblance to and tastes nothing like pork in any way (I guess it's because of the curing process).... Boy, between Niki's recent admittance of her "yield" confusion and my late epiphany about ham being from pigs (it happened in college, I think), you'd think the Evans twins should be barred from the kitchen for the greater good....
******
Prep: 25 minutes
Chill: 2 to 24 hours
Bake: 50 minutes
Oven: 325 degrees
4 whole-wheat English muffins, torn/cut into bite-sized pieces
1 cup (6 oz) cubed fully-cooked ham
1 cup (5-6 oz) asparagus cut into bite-sized pieces
6 oz swiss cheese (either grated or sliced & torn into small pieces)
4 beaten eggs
1 1/2 cups milk
1/2 cup sour cream
2 Tbsp finely chopped onion (or 1 tsp dried minced onion)
1 Tbsp Dijon-style mustard ("Pardon me sir....")
1/4 tsp caraway seeds
1/8 tsp pepper
1) In a greased 2-quart square casserole dish, create a layer of half of the English muffin pieces. Top with layers of the ham, asparagus, swiss cheese, and then spread the remaining English muffin pieces on the very top.
2) In a bowl, mix the eggs, milk, sour cream, onion, mustard, caraway seeds, and pepper. Pour evenly over top of the layers in the casserole dish.
3) Cover and chill in the fridge for at least 2 hours, but no longer than 24 hours.
3) Uncover the dish and bake for 50-55 minutes in a 325 degree oven or till a knife inserted near the center comes out clean. If you have reached an hour and the knife still doesn't come out clean, go ahead and take the dish out-- you're just stuck with slightly watery strata. It's still really yummy! Let is stand for 5 to 10 minutes before serving.
******
This theoretically makes 6 servings, but it's pretty heavy and a little goes a long way, so for once, this "yield" is pretty accurate, no matter how hungry you are! Leftover strata keeps really well in the fridge and is great either cold or re-heated.
Oh, by the way, the first time I made this, I somehow missed the part about the asparagus being cut up. I baked it with a layer of long asparagus spears. Not that it affected the taste in any way, but it was a bit hard to serve. WHOOPS!
Here's a picture of the strata I made two weekends ago for my in-laws, who were visiting from the Dallas-Fort Worth area:

The chef and her strata! (picture taken by my father-in-law)

On a related note, can someone else please tell me that they, too, didn't realize that ham came from a pig until way later than most people figure it out? I mean, ham bears no resemblance to and tastes nothing like pork in any way (I guess it's because of the curing process).... Boy, between Niki's recent admittance of her "yield" confusion and my late epiphany about ham being from pigs (it happened in college, I think), you'd think the Evans twins should be barred from the kitchen for the greater good....
Sunday, March 21, 2010
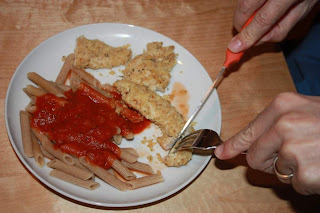
Corey and Charlotte make Baked Swiss Chicken
Is it done yet?

Charlotte! Get your feet back down on that chair!!
(BTW, the dish turned out great.)

Charlotte! Get your feet back down on that chair!!
(BTW, the dish turned out great.)
Saturday, March 20, 2010
Meem's Snickerdoodles
These are AWESOME. Especially for someone recently diagnosed as moderately allergic to chocolate. Good thing I don't know any poor soul who had that happen. Anyway, Meem is what my siblings and cousins and I all call our grandmother. Meem gave me this recipe, hence the name. By the way, what on EARTH is cream of tartar? I have never seen it called for in any recipe other than this one and another I saw for lemon meringue pie. How do they come up with this stuff?
I have made these with wheat flour before and they turned out great. I also have used butter-flavored shortening and the result wasn't too different than usual. By the way, those Crisco shortening sticks are definitely the way to go. They are sooooooo much easier to measure than scooping it out of a big tub, getting it all over your hands, and then getting it all over everything else while you try to get the stupid stuff out of the measuring cups.
1 cup shortening
1 1/2 cup sugar
2 eggs
2 3/4 cups flour
2 teaspoons cream of tartar
1 teaspoon baking soda
1/2 teaspoon salt
cinnamon/sugar mixture*
*This is something everyone should have on hand to make cinnamon/sugar toast. What? You're all healthy and don't make stuff like that? Okay, it's a mixture of about three parts sugar to one part cinnamon. You will need about a half cup or so to make this recipe, so make triple that amount and save the rest to sprinkle on toast. You won't be sorry. Here's Charlotte, eating some of the yummy mix off of the counter:

I have made these with wheat flour before and they turned out great. I also have used butter-flavored shortening and the result wasn't too different than usual. By the way, those Crisco shortening sticks are definitely the way to go. They are sooooooo much easier to measure than scooping it out of a big tub, getting it all over your hands, and then getting it all over everything else while you try to get the stupid stuff out of the measuring cups.
MEEM'S SNICKERDOODLES
1 cup shortening
1 1/2 cup sugar
2 eggs
2 3/4 cups flour
2 teaspoons cream of tartar
1 teaspoon baking soda
1/2 teaspoon salt
cinnamon/sugar mixture*
- Cream sugar, shortening, & eggs.
- Add dry ingredients and mix well.
- Chill until dough can be handled
- Roll into walnut-sized balls, then roll in cinnamon/sugar mixture.
- Plop the balls onto a cookie sheet and bake at 350˙ for 9 or 10 minutes. You want them to get slightly browned along the edges, but definitely don't overbake them.
*This is something everyone should have on hand to make cinnamon/sugar toast. What? You're all healthy and don't make stuff like that? Okay, it's a mixture of about three parts sugar to one part cinnamon. You will need about a half cup or so to make this recipe, so make triple that amount and save the rest to sprinkle on toast. You won't be sorry. Here's Charlotte, eating some of the yummy mix off of the counter:

Thursday, March 18, 2010
Whole Wheat Banana Carrot Bread
I know we already have a banana bread recipe on the blog, but you can never really have enough banana bread, can you? This one is super easy, fast, fairly healthy, and delicious - and a great way to sneak veggies in the mouth of a super picky baby who likes to reach into her mouth and pull out the half-chewed peas and hand them to you. (Not that I would know anything about that.)
Not surprisingly, I got this recipe from my chef-in-residence (not for long! HA!) and muse, Josh. Here's how he wrote it out:
This recipe demonstrates the classic quick bread proportions: 1 cup sugar, 1/2 cup butter, 2 eggs, 2 cups flour, teaspoon baking powder, 1/2 teaspoon baking soda, 2 cups “fillings”. I modified it to avoid saturated or trans fats and to provide some fiber, but really any combination of ingredients works. You could try brown sugar, different fruits or vegetables…
1 cup sugar
6 1/2 tablespoons oil (100 ml)
2 large eggs
2 cups whole wheat flour
1 teaspoon salt
1 teaspoon baking powder
1/2 teaspoon baking soda
1/2 to 1 teaspoon assorted ground spices (cinnamon, nutmeg, cayenne, etc.)
1 cup mashed ripe banana
1 cup grated carrots
Beat together sugar, oil and eggs. In a separate bowl, sift together flour, salt, baking powder, and baking soda, and spices. Gently add dry ingredients to sugar and oil. Fold in banana and carrot. Pour into greased pan. Bake at 350 for 30 minutes to an hour, depending on shape of pan (shorter for square and flat, longer for loaf pan).
My notes: I made it this time with 1 cup of grated carrots and 1 cup of grated zucchini, because that's what I had in the house. Instead of grating the veggies, I put them in the Cuisinart, and only spent half an hour trying to figure out how to work the damn thing. (Oh, and apparently I used the wrong blade and "chopped" them instead of "grating", which is allegedly why the loaf turned out bright orange.) Also, I sprinkled in some cinnamon because I don't know shit about spices, but I sniffed at the nutmeg and cayenne and thought they were gross, and I didn't know what else to try. I cooked it in a loaf pan, and it needed an entire hour to cook through. It was delicious, though, and Josh, Frieda, and I have all been enjoying it!
 Veggies trapped in blender.

This is all that's left less than 24 hours later...
Tuesday, March 16, 2010
One myth busted
I don't know if I thought this because it was something my mom told me when I was little or if I just sort of made it up on my own. I always thought that if you ran the microwave without anything in it terrible things would happen. Maybe the microwave would blow up or lightning would strike from above. Something like that.
Well, I ran the microwave for a while two minutes on high without anything in it, and nothing happened. I thought the green beans were already in there, but it turns out I was mistaken (perhaps distracted by the zoo of animal figurines gathering on my counter as my daughter rounded them up. So I was wrong. And yes, the microwave worked just fine immediately after and a few minutes later when I warmed up Charlotte's leftover pizza.
Whew! I'm not going to repeat the experiment, but I feel better about not causing the end of the world.
Monday, March 15, 2010
Roast Beef with Tomatoes & Garlic
I found this recipe in Real Simple magazine, and after modifying it a bit, Andrew and I decided it was good enough to be included in the dinner rotation. The bad part about this recipe is that it's not all that cheap, and we have way too much leftover beef. A good roast is kind of a splurge, and unless you go to a real butcher, you can't buy it in a quantity that is appropriate for two adults and a baby who refuses to eat meat. So, we only make it once a month or so. But we end up craving it when we haven't had it in a while because seriously, roasted grape tomatoes + garlic + beef = heaven!!!
Note #1: I recommend peeling the garlic cloves ahead of time (perhaps the night before while watching Big Bang Theory on TV?). The original recipe says that the hands-on time is 10 minutes, but unless you buy those pricey already-peeled garlic cloves, it's going to take way longer! The fastest way to get the stuff off of the cloves is to take the flat part of a chef's knife blade, lay it on top of a clove that is sitting on a cutting board, and smash it firmly with your fist. Andrew taught me that-- he learned it by watching hours and hours of Bobby Flay on the Food Network. Here's a picture of the head of garlic after I peeled all of the cloves:

Note #2: Make sure the roast is 100% thawed. Every time I use a frozen roast, I inevitably forget to thaw it far enough ahead of time, and then I end up cooking it while it still has a frozen core. This results in chewy, underdone meat on the inside and gray, overdone meat on the outside. What a great way to waste a bunch of money.....
Note #3: Do not substitute table salt for Kosher salt unless you also adjust the measurement! Kosher salt has much bigger grains-- you will end up over-salting your recipe if you use the same amount of table salt. In case you forget to buy Kosher salt, use this conversion table so that you don't need to drink a gallon of water with your roast. Speaking of Kosher salt, Check out this totally awesome Le Creuset salt crock I got for Christmas.... I keep my Kosher salt in this crock out on the counter because I use it so often.

Hands-on time: 10 minutes (excluding the garlic peeling!)
Total time: 1 hour, 20 minutes (see above)
2 pounds boneless rib roast
1 1/4 tsp Kosher salt
3/4 tsp pepper
2 dry pints grape tomatoes
1 head garlic, cloves peeled
1 tsp dried thyme
3 Tbsp olive oil
Heat oven to 425 degrees.
Rub the beef with 1 tsp Kosher salt and 1/2 tsp pepper and place in a large roasting pan. Scatter the tomatoes and garlic cloves around the roast. Drizzle olive oil and sprinkle remaining Kosher salt and pepper over tomatoes and garlic.
This time when I made this recipe, I accidentally bought only one dry pint of grape tomatoes. Whoops!!!!

Put the roast in the oven at 425 degrees for 10 minutes, then turn the temperature down to 325 degrees and roast to desired doneness (around 45 more minutes-- this is going to vary with the shape/size of your roast.... check with a meat thermometer and make sure the internal temperature is appropriate, such as 125 degrees for medium rare). Transfer beef to a cutting board and let it rest for at least 10 minutes before slicing (and make sure you slice it fairly thin).
This last time I made it (when I didn't buy enough tomatoes), we served the roast with steamed green beans (I've grown up, Mom! I no longer like green beans only from out of a can!) and brown rice (Uncle Ben's Ready Rice, of course).

Sunday, March 14, 2010
Who are you calling a dip?
By popular demand (well, Joslyne's demand, anyway), here is the recipe for a lime fruit dip. I made it for Charlotte's second birthday party yesterday and there was always some partygoer parked by it for the duration of the event. I am currently eating the left over dip (a very tiny amount, unfortunately) and trying to think of an excuse to make some more. Too bad Zoey's birthday isn't until May.
The ingredients are simple, so there is no excuse to pass on trying this recipe because it's too complicated. Ask Erin sometime about the time she stashed a jar of marshmallow creme under the bathroom sink and created a family mystery -- one that lasted for two decades until she confessed -- as to how it got there.
1 package (8 ounces) cream cheese, softened
1 jar (7 ounces) marshmallow creme
1 carton (6 ounces) lime-flavored yogurt
1 drop green food coloring (optional)

*Funny and/or embarrassing story -- until very recently, I kind of thought the "yield" of a recipe meant you should slow down and stop once you have made this much. I guess I just never thought about it very hard. Yes, I'm an idiot.
The ingredients are simple, so there is no excuse to pass on trying this recipe because it's too complicated. Ask Erin sometime about the time she stashed a jar of marshmallow creme under the bathroom sink and created a family mystery -- one that lasted for two decades until she confessed -- as to how it got there.
LIME FRUIT DIP
1 package (8 ounces) cream cheese, softened
1 jar (7 ounces) marshmallow creme
1 carton (6 ounces) lime-flavored yogurt
1 drop green food coloring (optional)
- Beat the cream cheese until smooth. It really does turn out better if you soften the cream cheese first -- I didn't do this and there were little hunks of cream cheese swimming in the dip. It tasted just fine, but the texture wasn't optimal.
- Beat in the marshmallow creme and wonder how on earth this product was ever invented.
- Fold in yogurt and food coloring if desired. The food coloring may be optional, but it adds such a pretty hue to the dip that I deemed it necessary.
- Cover and refrigerate until serving. Serve with fruit (or a spoon or your finger, depending on how desperate you are).
- Yield: 2 1/2 cups*

*Funny and/or embarrassing story -- until very recently, I kind of thought the "yield" of a recipe meant you should slow down and stop once you have made this much. I guess I just never thought about it very hard. Yes, I'm an idiot.
Saturday, March 13, 2010
Chicken Delicious
Andrew and I found this awesome cheesily-named recipe in a pretty decent crock pot cookbook that I'm pretty sure Andrew's mom bought us at Sam's Club. I could have made that part up, though. FYI, I refuse to call it a slow cooker, even though crock pot is technically a brand name. We have made a few modifications to the recipe, and now it RULES. No pre-cooking of the meat (you know how I feel about that), no other bowls/pots/pans needed, and the potential to have an almost-full bottle of wine left over afterward to drink with dinner. This recipe will make enough for two hungry adults, and it would be really easy to double (or triple if you have a big crock pot) the recipe for a larger group.
2 large boneless skinless chicken breasts (unfrozen!)
2 Tbsp lemon juice
Grated parmesan cheese (fresh is awesome, but dried will work okay)
Hot cooked rice
Pour the cream of mushroom soup and wine into the crock pot and stir until they are combined. Place the chicken breasts on top of the mixture and pour the lemon juice over them. Sprinkle the salts, pepper, and paprika over the chicken. Spoon the soup/wine mixture over the top of the chicken breasts so that they are well covered. Sprinkle as much grated parmesan cheese over the chicken as you want. Cover the crock pot and cook for either 4-5 hours on High or 8-10 hours on Low. Even though the chicken is being cooked in a crock pot, it can still get dried out, so I would recommend staying on the low end of the cooking times. Here's what it looks like when it's done cooking (crock pot meals never look as good as they taste!):

This time when I made it, I put a ton (probably way too much, if there is such a thing) of parmesan cheese on top, so the grease you see floating in the sauce isn't going to be there every time you make this recipe, I promise!
We serve the chicken with brown rice (the Uncle Ben's Ready Rice, of course) and spoon generous amounts of the sauce onto our plates. If you wanted to, you could use bread to sop up the sauce. It's so good!!!

So, there you have it. Only one dish dirtied (woo hoo!), and it takes just about 15 minutes at the most to dump all of the ingredients in (that's mostly from having to measure stuff). The picture above of the meal in the crock pot may make it look like the crock pot needs to be soaked and scrubbed to get off all of the crusties, but I assure you, it doesn't (unless you leave it sitting in the sink overnight before cleaning it, and even then, you could just fill it with water to avoid this problem). There's something about the way crock pot meals are cooked with all the steam and whatnot that make for fairly easy cleanup. But if you're worried about it, just let the crock pot soak while you're eating!
Ingredients:
2 cans (10 1/2 oz) cream of mushroom soup
1/3 cup dry white wine (buy a bottle you like, 'cause you'll have a lot left over)2 large boneless skinless chicken breasts (unfrozen!)
1 tsp kosher salt
1 tsp celery salt1/2 tsp pepper
1/2 tsp paprikaGrated parmesan cheese (fresh is awesome, but dried will work okay)
Hot cooked rice
Pour the cream of mushroom soup and wine into the crock pot and stir until they are combined. Place the chicken breasts on top of the mixture and pour the lemon juice over them. Sprinkle the salts, pepper, and paprika over the chicken. Spoon the soup/wine mixture over the top of the chicken breasts so that they are well covered. Sprinkle as much grated parmesan cheese over the chicken as you want. Cover the crock pot and cook for either 4-5 hours on High or 8-10 hours on Low. Even though the chicken is being cooked in a crock pot, it can still get dried out, so I would recommend staying on the low end of the cooking times. Here's what it looks like when it's done cooking (crock pot meals never look as good as they taste!):

This time when I made it, I put a ton (probably way too much, if there is such a thing) of parmesan cheese on top, so the grease you see floating in the sauce isn't going to be there every time you make this recipe, I promise!
We serve the chicken with brown rice (the Uncle Ben's Ready Rice, of course) and spoon generous amounts of the sauce onto our plates. If you wanted to, you could use bread to sop up the sauce. It's so good!!!

So, there you have it. Only one dish dirtied (woo hoo!), and it takes just about 15 minutes at the most to dump all of the ingredients in (that's mostly from having to measure stuff). The picture above of the meal in the crock pot may make it look like the crock pot needs to be soaked and scrubbed to get off all of the crusties, but I assure you, it doesn't (unless you leave it sitting in the sink overnight before cleaning it, and even then, you could just fill it with water to avoid this problem). There's something about the way crock pot meals are cooked with all the steam and whatnot that make for fairly easy cleanup. But if you're worried about it, just let the crock pot soak while you're eating!
Friday, March 12, 2010
In Which We Make 'Chicken A La Niki'
Zoey smashes the crackers to smithereens. It's so easy she can do it with her eyes closed!

But then the bag bursts so we have to use a bowl. The double wooden-spoon-and-pestle technique seems to work well.

Behold! Everything looks good!

Demetri, AKA The Taste Tester, cuts into the Chicken A La Niki . . .
He brings it towards his mouth . . .

And tries it!

And we have THE THUMBS UP! Culinary victory is ours!!!

Zoey then gives the often coveted and rarely seen 'Dude-this-stuff-is-wicked-awesome' finger point/thumbs up.

Ah yes, another successful meal thanks to The Flaming Toaster.
Thursday, March 11, 2010
Baked French Toast
I love to make this recipe for a brunch because you can make it the night before and then just pop it in the oven! Not super healthy, but YUMMY. :)
Ingredients:
1 cup brown sugar
1 stick of butter
2 tablespoons corn syrup
French bread- cut into 2 inch thick slices
6 eggs
2 cups milk
1 1/2 teaspoons vanilla
toppings for french toast
1. Bring to boil: 1 cup brown sugar, butter, corn syrup.
2. Boil 30 seconds.
3. Pour mixture into a 13 by 9 inch pan. Lay french bread pieces on top of mixture.
4. Beat eggs, milk and vanilla together.
5. Pour egg mixture over bread.
6. Cover and refrigerate overnight. Bake at 325 for 35 minutes, uncovered.
Top with whatever you want to top your french toast with: strawberries, raspberries, powdered sugar, syrup, etc. We usually find that it is so sweet that you don't need syrup or sugar, but berries are always a good addition!
Another one Carla can't eat, but still good anyway...
This is so simply delicious -- mainly because it relies on store-bought croutons for the seasoning. Healthy, right?!?! My husband would live on a diet of croutons and nachos (not together though) if he could, so he loves this recipe. Except it doesn't have anything to do with nachos. But I digress...
BAKED SWISS CHICKEN
(aka "Niki's Cheesy Chicken")
6 boneless skinless chicken breast halves (or equivalent of 1.5 lbs. chicken)
1 can (10.75 oz.) condensed cream of chicken soup, undiluted
1/2 cup white wine OR chicken broth (I prefer the broth)
6 slices Swiss cheese
1 cup crushed seasoned croutons
--Place chicken in a greased 13"x9" baking dish. If you're like Joslyne and have no working knowledge of the size of your baking dishes and an inability to estimate what size a 13"x9" dish is, then get the one out that is about the size of a legal length piece of paper. Or get a tape measure. Or read the nearly illegible numbers on the bottom of your dish. Or wait until someone with street smarts stops by and ask her.
--In another bowl, combine the soup and wine/broth. Then pour it over the chicken.
--Top with cheese and sprinkle with crushed croutons.
--Bake, uncovered, at 350˚ for 35-40 minutes or until chicken juices run clear (which I have never been able to use as a guide, so I usually sacrifice one piece and cut it open to check).
Super Fast Meals for a Super Hungry Baby
My daughter, not unlike me, has the tendency to go from zero to holy-crap-I'm-freaking-out-feed-me-now! in about sixty seconds. Yes, there are nights when I'm actually on top of things and I can get dinner made and on the table before the hunger-induced meltdown happens. And then there are the other nights, like tonight, when I'm exhausted and the baby is exhausted and I feel like I'm always at least five or ten minutes behind...
Those are the nights when I rely on Super Fast Meals. And by Super Fast, I mean less then five minutes from fridge to table. I don't have a huge repertoire, but I have a few, and I thought I would share them here.
First, those foods which need to be cooked ahead of time, but make great leftovers, and can be served either cold or with a minute or less of microwave time:
- Poached salmon with yogurt (There's a good recipe for poaching salmon here - and you can make it without adding all the veggies. Just boil the water, add a little salt, stick the fillet in, and cook it until it looks cooked when you cut it open.) I add a little yogurt instead of fancy-schmancy dill sauce, and voila! (Can be served cold or warmed up.)
- Baked sweet potatoes. Preheat oven to 425. Cover a cookie pan with foil. Scrub the potatoes and poke a few holes in each one. Stick 'em on the pan, put it in oven, and check on them about an hour later. EASY and healthy. I store them in tupperware, and just cut off a chunk at meal time. Choochie will eat it cold or heated up.
- Pasta - I cook up a big box at a time, feed some to the Chooch, and store the rest in tupperware for future meals. When it's time for dinner, I throw in some frozen peas or carrots, heat it up in the microwave, and then add a little olive oil and parmesan. Choochie won't eat the peas these days, but I keep trying.
Now, let's say you don't have anything pre-cooked. Here are some ingredients (fresh, frozen, and canned) that you can keep in the house and mix and match for a fast meal. (And I mean, faster than making Mac N Cheese out of the box,which takes about 20 minutes to cook the noodles. There are nights when I don't have 20 minutes!)
- Veggie burgers (Choochie loves them, and they can be microwaved in about 90 seconds!)
- Avocado - very healthy!
- Canned beans (pinto, black, or green)
- Microwave burritos - there are some healthy options out there that are primarily beans and cheese. We buy these, and the veggies burgers, in big boxes at Costco.
- Fresh or frozen veggies hidden in hummus
- Cottage cheese
- Black bean dip from Trader Joe's
- Frozen turkey balls from Trader Joe's
- Fruit and cheese
- Pita bread in tiny pieces
Anyway, that's what comes to mind. What do you all like for Super Fast Meals?
Creamy Chicken Goodness or The Ultimate Comfort Food
I randomly tried this recipe last week and it was, in a word, AWESOME. It may not be, uh, good for the body (as in healthy) but, oh mama!, it is great for the soul. Plus it involves 'whisking' and 'thickening of sauces' so you feel like a real chef.
6 T. butter
6 T. flour
1 tsp. salt
1/2 tsp. pepper
1-1/2 c. chicken stock
1 c. cream or whole milk (I used whole milk)
1c. cut up, cooked chicken
1. melt butter in skillet over low heat
2. Whisk in flour, salt, and pepper
3. Cook over low heat until bubbling.
4. Remove from heat and slowly stir in chicken stock and milk.
5. Return to heat and slowing bring to boil stirring constantly. Boil 1 minute. DO NOT PANIC. The stuff will be super watery for a very long time. It WILL thicken, just keep stirring.
6. Stir in cooked chicken and simmer until everything is warm.
7. Serve over rice or bread
Wednesday, March 10, 2010
Fail
Dinner fail. I just ruined a tuna noodle casserole by not reading the directions carefully enough. I was distracted by a really bad mood and exhausted from holding a gregarious 10 month-old baby for over an hour while a Lisle police officer crawled around in the backseat of my Mini Cooper attempting to help me install a convertible carseat in the rear-facing position. The sad thing is that I have made this tuna noodle casserole twice before, and I didn't screw it up those other times.... This time, though, I accidentally put in 3 cups of pasta as measured before cooking it, as opposed to 3 cups of cooked pasta. Big difference. And I can't even start over because due to my knack for buying random ingredients that sit on the shelf unused until expiration, I have no extra cream of mushroom soup or tuna or noodles. And now Sonia has just woken up from a nap that I know she desperately needs after only 30 minutes. Gotta go get the kid....
Easy-Peasy-Cheesy Bread
This bread doesn't even require kneading! Or rising! Or . . . all those other complicated things that most breads do! So go cray-zeee!
1-3/4 cups flour
1/4 cup sugar
2-1/2 tsp baking powder
3/4 tsp salt
1 cup shredded cheddar cheese
1 egg
3/4 cup milk
1/3 cup vegetable oil
1. Preheat oven to 400 F. Grease 9x5 loaf pan.
2. Mix together flour, sugar, baking powder, salt, and cheese.
3. In another large bowl whisk together egg, milk, and vegetable oil.
4. Stir the flor/cheese mixture into the milk mixture until just moistened. Pour into loaf pan.
5. Bake for about 35 minutes or until a toothpick inserted into the middle of the loaf comes out clean.
Tuesday, March 9, 2010
"Oven-Fried" Pork Chops
I asked Andrew what he considered to be his favorite dish among the ones that make up my limited dinner repertoire, and he answered "'Oven-Fried' Pork Chops" with no hesitation. He then mentioned that he thinks we should have it at least once every other week. Seeing as how it's so easy & fast, I have no problem whatsoever with that! I found this recipe when I was scouring my BHG cookbook for dishes that fit my preparation requirements. As I alluded to before, here are my requirements for such a recipe:
1) Easy (novice chef alert!)
2) Can either be prepared in less than 30 minutes far ahead of time and refrigerated before being popped into the oven, or can be prepared right before eating in less than 30 minutes (so I can just make it once Andrew gets home at 6:45pm and takes over the "put the kid to bed" duties)
3) No weird vegetables (My 16th birthday present from my parents was to never have to eat vegetables again if I didn't want to.... I might die of scurvy, but that's something I'm willing to risk.)
4) No need to do a bunch of steps during the hour before serving (I'm busy feeding and changing Sonia during the 45 minutes before Andrew gets home, and I want us to eat within 30 minutes after he gets home)
I'm picky and demanding! Not a lot of recipes fit the bill.... But "Oven-Fried" Pork Chops does! Here is my adaptation of that recipe:
Prep time: 10 minutes
Bake time: 20 minutes
Oven: 425 degrees
Ingredients:
4 pork loin chops, cut 3/4 inch thick (these are pretty standard fare in most grocery stores)

2 Tbsp margarine or butter, melted
1 beaten egg
2 Tbsp milk (or heavy whipping cream or buttermilk)
1/8 tsp pepper
1 1/4 cups herb-seasoned stuffing mix, crushed

Tip: Make sure you have 1 1/4 cups of crushed stuffing-- not 1 1/4 cups of stuffing before you crush it. Also, if you have a mortar and pestle, bust that thing out to do the crushing (if not, use the bottom of a pot). I asked for the mortar & pestle in the picture for Christmas this year specifically because I make this recipe so much!
1) Pour margarine/butter into a 13x9x2-inch casserole dish. Combine egg, milk, and pepper. Dip chops into egg mixture and then coat with stuffing mix (be generous with the stuffing!) and place in dish on top of melted margarine/butter. Take any leftover crushed stuffing and dump it on top of the chops. You'll thank me later! Here's what it will look like before you stick the dish in the oven:

2) Bake at 425 degrees for 10 minutes. Quickly take dish out of oven, turn chops (use a fork or tongs), and put dish back in oven. Bake about 10 minute more or till no pink remains and juices run clear. Makes 4 servings, but only if you have substantial sides to serve with the pork chops. Here's the finished product:

We usually have either rice or barley as a side dish, and Andrew scoops out the burnt stuffing crunchies from the pan to dump them over the rice or barley. YUM!!!!
Monday, March 8, 2010
Quesadilla Pie
I found this little doozy on Simply Recipes. It's super easy and tasty, and normally I would just link you to the original recipe, but my first attempt didn't come out so well so I'm adding a few notes in red that might help anyone else who tries it. Everything else is straight from the SR website.
Brush butter on the bottom of the pan to keep the tortillas from sticking, and to the top of the last tortilla for flavor and to help it brown. Hint: do not skip the butter.
Basic ingredients:Method 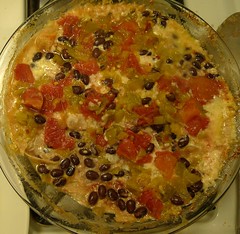
Brush butter on the bottom of the pan to keep the tortillas from sticking, and to the top of the last tortilla for flavor and to help it brown. Hint: do not skip the butter.
Basic ingredients:
- 4 large flour tortillas (9-10 inches diameter) Don't try to go all health nut and use whole wheat tortillas. They don't work as well. Josh thinks corn would work best, and they may be worth a shot!
- Butter
- 1/2 pound grated cheese, either mild or sharp cheddar, or Monterey Jack
Potential filling ingredients:
- Beans, cooked (black beans, pinto beans)
- Tomatoes, chopped I used a can of diced tomatoes, and the chunks were really too big and watery. I would recommend either chopping up a fresh one, or using a well-drained can of petit diced.
- Summer squash, chopped
- Onions (green onions, red onions, onion greens) Half an onion should be sufficient...
- Mushrooms (if using a lot, sauté first, to remove moisture)
- Cooked shredded chicken, pork, or beef
- Chiles, either from cooked green chiles, chopped pickled jalapenos, or salsa I used a small can of Hatch Green Chile, but I didn't drain it well enough. Be sure to drain drain!
- Cumin and/or chili powder for extra heat
Garnishes:
- Chopped avocado
- Chopped cilantro
- Thinly sliced iceberg lettuce dressed with vinegar and salt
- Sour cream
- Salsa
1 Preheat oven to 350°F. Butter the bottoms and sides of a pie dish, approximately the same size as your tortillas (I used a 10-inch pyrex pie dish for 10-inch wide tortillas).


2 Place one tortilla on the bottom of the pie dish. Sprinkle some shredded cheese over the tortilla. At this point, you will begin to add your chosen filling ingredients, and layering the tortillas. Just make sure each layer has a generous sprinkling of cheese. In the pictured example, I used cheese, black beans, and onion greens on the first layer. Then I added another tortilla on top of that and put chopped zucchini, chopped tomato, chopped pickled jalapenos, and more shredded cheese. I also sprinkled a little cumin and chili powder on this layer. I added another tortilla and put more shredded cheese, more black beans, tomatoes and onions. Top off your layers with one last flour tortilla. Spread a little butter over the surface of this tortilla.
3 Cover the dish with aluminum foil. Put in oven for 30 minutes on 350°F. Then remove the foil and increase the heat to 400°F. Cook for another 15-20 minutes, until the top is lightly browned and cheese is bubbly. Remove from oven. Let cool for 10 minutes before serving. Cut into quarters.
Serve with chopped avocados, shredded lettuce, cilantro, salsa, and/or sour cream.
Serves 4.
Be sure to drain your ingredients well, otherwise your dish will end up looking like mine! (Although Josh was very sweet and insisted it still tasted good. I thought it was good enough, but not great!)
Banana Bread from the past
The best banana bread I have ever eaten is also the one that I make at least once a month. I purposely buy too many bananas to the extra ones that we don't eat simply HAVE to be made into banana bread. The recipe comes out of my mom's way-old Better Homes & Garden cookbook (of which I have a more recent version-- I think my mom's version might be this one), and I have a feeling it just wouldn't fly today, what with all the shortening and whatnot. This is a fabulous thing to bring to brunch, and you can eat it straight or toast & butter a slice.
I love when I can see a picture of a recipe, but I don't have one on hand at the moment.... Next time I bake a loaf (we have bananas sitting on the counter, ripening as I type this!), I will post a picture!
***
Banana Bread:
Ingredients:
1/3 cup shortening (buy the Crisco sticks of shortening-- they're the easiest!)
1/2 cup sugar
2 eggs
1 cup ripe bananas, mashed (about 2 medium or 3 small bananas)
1 and 3/4 cup flour
1 tsp baking powder
1/2 tsp baking soda
1/2 tsp salt
Instructions: Preheat oven to 350 degrees. Cream shortening and sugar together, and then add the eggs and mix well. Add the bananas and mix well. Sift together dry ingredients, then add to mixture and mix well. Bake 45-50 minutes in a 9x5x3" loaf pan (greased on bottom and 1/2 inch up the sides). Bread stores best (once it cools) in either foil or a zippered plastic bag.
***
I have baked this recipe so many times that I almost have it memorized, and I can whip it up while Sonia sits in her high chair, shoveling those Gerber cheeto-thingies in her mouth. Once I have the bread baked, Sonia will eat it as well, but only if I smoosh a little piece up into a shape like a tiny UFO and feed it to her. When she picks up the bread herself, she just plays with it until it crumbles. Cuckoo baby!!!

Dinner on the table every night?
I decided that if I was going to be a stay-at-home mom (li'l Sonia was born on May 13, 2009), I would do all of the cooking and cleaning during the week. This posed QUITE a problem, though.... See, I have no natural cooking ability. I look at the ingredients in our pantry and see just that-- ingredients. If I go to the grocery store without a specific plan, I come home with either nothing, or components not fit for actual meals-- the stuff I buy will sit in our pantry or fridge for months, expire, and get thrown out. If it wasn't for take-out, cereal, mac & cheese, and my husband loving to cook, I might have starved to death once I moved out on my own. I still miss my college dining hall....
My husband, Andrew, and I agreed that I shouldn't worry about cooking dinner for the first few months. We survived on frozen pizza, take-out, and things that one of us could cook quickly after Andrew got home (at the time, it never occurred to us that something other than spaghetti with jarred sauce could be a "quick dinner" possibility, so we ate a lot of pasta). But, by the time my daughter was about 3 months old and had a regular bedtime of 7pm, I was getting the hang of things. The house was clean(ish), the laundry was always done.... I felt that I should get cooking. I started small by making dinner twice a week and upping the frequency as I got more comfortable. My friend (and personal hero), Carol, gave me advice about how to get cooking done while taking care of a kid: do the prep work during naptime. Sonia was settling in to a napping schedule of napping three times a day for at least a half an hour each time-- one of the naps was shower time for me, but one or both of the other two naps were fair game.
So what in the heck was I going to cook?!?!?!?
My repertoire at the time was very limited: tacos, sloppy joes, and chicken legs. Andrew is an enthusiastic amateur chef, so we have a good amount of cookbooks. Unfortunately, most of the recipes in said cookbooks contain an ingredient list longer than Crystal Gayle's hair and require WAY too much time to make. I had one or two naptimes and maybe 20-30 minutes after Andrew got home to work with.
I finally figured out that dishes such as casseroles were perfect-- I could prepare them during naptime and then refrigerate them until it was time to pop 'em in the oven. Also, CROCK POT! But only crock pot recipes that do not require pre-cooking of the food. I mean, what IS that? If you have to pre-brown the meat and saute the veggies (creating more dishes to wash-- UGH), what is the crock pot doing all day? Warming your food? That's just dumb. I also discovered that my huge Better Homes and Gardens cookbook had recipes marked marked "FAST" in the index, a lot of those can be prepared in 20 minutes or so. To solve my grocery shopping idiocy problems, I had to force myself to plan an entire week of meals and make a shopping list based on that. And the best discovery of all? Uncle Ben's Ready Rice. Holy mackerel, it RULES!!!!
I know, I know.... This all seems pretty obvious to most normal people, but to me, it was a revelation. Once I started spending a bit of time actually planning ahead before wandering aimlessly through Jewel and coming out empty-handed, this whole cooking thing seemed a lot less scary. Plus, Andrew is incredibly supportive about my cooking endeavors. He makes all the right "yum" noises and brags about my cooking (even though what I cook is still far, far, far more basic than the dishes he whips up on a whim out of random scrounged ingredients).
For my Flaming Toaster contributions, I'll be posting recipes/instructions for the 20 or so (!!) dishes in my new & improved repertoire. My posts may lack the wit and writing talent of my fellow Flaming Toaster authors, but I can guarantee you some great recipes!
I don't want her to grow up any faster than she already is, but I really can't wait until Sonia is old enough to cook and bake with me!

Sunday, March 7, 2010
Crack (aka Cucumber Salsa)
Every time I make this, people demand the recipe. DEMAND it. At our neighborhood's rib cook-off, I wrote it down and one of my neighbors raced inside to use his fax machine to duplicate it to satisfy demand.
1 cucumber
1 pint cherry or grape tomatoes
1 green onion
handful of cilantro (just the leaves)
1 jalapeno (seeds and ribs removed, or you'll be sorry!)
1 tsp minced garlic
1 tsp lime juice (I usually add more though)
1/2 tsp salt (I like to use sea salt)
1/4 tsp ground pepper
1/8 tsp ground cumin
1 tbsp sour cream
**I recommend slicing and removing the seeds/ribs while wearing rubber gloves, lest you later forget you might have jalapeno oil lingering on your hands and you wipe your nose. WOWZA. That was not pleasant. And yes I was done cooking when I wiped my nose.
Every time I make it, the result is slightly different. This is probably because the freshness and quality of the ingredients is paramount. If I actually knew what I was doing when selecting the vegetables then I might have some good tips. As such, it's kind of a crapshoot what I end up coming home with from the grocery store. As long as you get the seasonings right, the outcome will still be pretty darn good.
CUCUMBER SALSA
1 cucumber
1 pint cherry or grape tomatoes
1 green onion
handful of cilantro (just the leaves)
1 jalapeno (seeds and ribs removed, or you'll be sorry!)
1 tsp minced garlic
1 tsp lime juice (I usually add more though)
1/2 tsp salt (I like to use sea salt)
1/4 tsp ground pepper
1/8 tsp ground cumin
1 tbsp sour cream
- Mince the cucumber and tomatoes (in small batches) in a food processor* until they are about the texture of chunky applesauce. As you empty the batches of minced veggies out of the food processor, dump them into a colander in the sink to let them drain while you prepare the rest of the salsa. Cucumbers and tomatoes are juicy little buggers.
- Toss the green onion, cilantro leaves, and jalapeno** in the food processor and puree those puppies. If you're as big of a wimp as I am about spicy food, you won't want to run into an errant chunk of jalapeno by accident.
- Dump the veggies, ground pepper, ground cumin, and sour cream into a bowl and mix them up. Taste it. Then add the lime and salt and taste it again while marveling at the incredible difference those beauties make to the salsa. If you're not wowed by the improvement in flavor, slowly add more lime and salt until the wow factor emerges.
**I recommend slicing and removing the seeds/ribs while wearing rubber gloves, lest you later forget you might have jalapeno oil lingering on your hands and you wipe your nose. WOWZA. That was not pleasant. And yes I was done cooking when I wiped my nose.
Chicken Pastry Puffs
This is a super yummy and easy way to use leftover chicken! We buy a rotisserie chicken and make this with the leftovers. It is a rich dish with the cream cheese in it, but we balance it out with some broccoli or a salad on the side. Yum.
Chicken Pastry Puffs
1 cup cooked chicken, cut up into small pieces
1 3 oz. package of cream cheese
3 Tablespoons melted butter
1/4 tsp. seasoned salt
2 Tablespoons milk
1/2 tsp. onion powder
1 pkg. crescent rolls
3/4 cups crushed croutons (optional)
shredded cheddar topping (optional)
1. Grease cookie sheet
2. Beat cream cheese, butter (save a tiny bit for brushing on rolls later), milk, and seasonings until smooth.
3. Add chicken to cream cheese mixture.
4. Unwrap rolls and make 4 squares using 2 triangles.
5. Put a mound of chicken mixture on each sqaure, pull up sides and seal.
6. Brush with extra butter and sprinkle with croutons (I don't always use these on top)
7. Bake at 350 degrees for 25 minutes, sprinkle with cheese and melt in oven for a couple more minutes.
Super Easy Guacamole
I didn't like guacamole at all before my first pregnancy, but ever since then, I can't stop eating it. Thank goodness avocados have been on sale this winter!
Lots of people put tomatoes, onions, or other such nonsense in their guac, but I like to keep really simple. Also, I like it a little bit spicy. Seeing as how I'm from New Mexico, I'm always looking for opportunities to increase the Hatch Green Chile quotient of my diet. Fortunately, canned green chile is now available in Whole Foods and other grocery stores, and you can actually get it fresh in the fall. We like to order the single serving packets from 505 Chile.
Anyway, here's the recipe for one hearty serving of guac, enough for two hungry adults and a baby who eats way more than you would expect.
2 avocados
1 lime
1 small can of green chile
salt
Cut open the avocados the long way, and remove the pit. (There is a good tutorial on Simply Recipes for how to do this - scroll down to 2B to see how to use a knife to get the pit out.)
Scoop out the insides of the avocado into a bowl. Mash it up with a fork.
Add the can of green chile, half a lime (or more, depending on your preference), and salt to taste.
Grab some chips and ENJOY!
I Am a Baking Goddess! Watch Me Make BREAD!
3/4 cup warm water
2 -1/4 tsp active dry yeast (or 1 of those small packages)
1 tsp salt
1-1/2 tbsp sugar
1 tbsp butter, very softened (or Crisco)
1/2 cup milk
3 - 4 cups all-purpose flour
1. Put warm water in a large bowl. Slowly stir in the yeast until disolved.
2. Add salt, sugar, butter, and milk to bowl and stir.
3. Mix in 2 cups of flour a little bit at a time.
4. Continue adding flour a bit at a time until dough is thick and soft and in one big glob. Dough should not be overly sticky.
5. Put glob of dough on a clean, floured surface (like a counter or pastry board). Kneed dough using flour as needed.
6. Knead until dough is soft, smooth, and not sticky.
7. Put dough in buttered bowl, and turn over so all sides of dough are buttered. Cover bowl and let bread rise for an hour or so.
8. Punch the dough down in the bowl and then remove and knead on floured surface.
9. Form dough into a loaf shape and set in a buttered bread pan.
10. Cover pan and let dough rise for about 30 minutes.
11. Begin preheating oven to 375F
12. Bake for about 45 minutes or until goldeny brown
13. Eat, brag, and enjoy your new status as bread-Baking Goddess.

Saturday, March 6, 2010
Chicken a la Niki
The original recipe that this variation is based off of came from a book called Clueless in the Kitchen: A Cookbook for Teens and Other Beginners. My mom gave it to me when I was 22. We crossed out the word "Teens" and wrote "Niki" above it to make me feel better about my kitchen ineptitude. Because I never had the right ingredients on hand, I kept messing with the recipe until I found the perfect combination loved and adored by my husband.
I say that the seasonings are "to taste" because I just keep adding a pinch at a time until it tastes yummy. (I know -- hard to believe I don't have my own cooking show!) When I didn't have olive oil, I used milk or a beaten egg. Once I found myself without Italian Seasoning, so I just threw in a little basil and rosemary. Instead of saltines, I have used store bought "bread crumbs", Ritz Crackers (regular and whole wheat), and other random crackers I had stuck in the back of the pantry. Be creative and use whatever stale crackery-type objects you have floating around in the disaster-you-used-to-call-a-pantry-that-your-toddler-just-helpfully-rearranged-for-you.

CHICKEN A LA NIKI
One package chicken tenders
One sleeve of saltine crackers
Seasoned salt (to taste)
Italian Seasoning (to taste)
1/2 cup extra virgin olive oil
- Preheat oven to 350 degrees.
- Spread some aluminum foil onto a cookie/baking sheet. If you have some of those nifty metal cooling racks, put them on top of the aluminum foil. If not, don't worry about it.
- Crush the saltine crackers into smithereens and pour them into a bowl. Mix in a couple of pinches of the seasoned salt and Italian Seasoning, then taste it. Not salty enough? Add some more seasoned salt. Can't taste the Italian Seasoning? Add some more. See how easy this is?
- Pour the olive oil into a bowl. Dip a chicken tender in it, then roll the tender in the breading mix. Plop the little guy onto the cookie sheet (and on the cooling rack if you have it) and repeat the process until you run out of tenders. Sprinkle the leftover breading on the tenders.
- Pop the cookie sheet into the oven and set the timer for 15 minutes. (If you don't have the cooling racks and are baking the chicken directly on the aluminum foil, then set the timer for 8 minutes. When the timer rings, flip over the tenders, and set it again for 7 minutes.) Take out a tender and cut it open to make sure its done. As far as I can tell, there's no way to reliably check the temperature of such a thin cut of chicken, so I don't even bother to try.
It's good to dip the tenders in spaghetti sauce. I like making a side of pasta with some jarred spaghetti sauce. A few times, I added grated parmesan cheese into the breading mix and it was pretty good.
I actually made this for dinner tonight using cornflake crumbs (they sell these in a box!!), and they were terrific. We sliced them up and wrapped them in tortillas with shredded lettuce, cheese, and ranch dressing. Better than a Sonic chicken wrap!
This recipe makes enough for two super hungry adults who tend to overeat, but if you make pasta and a salad to go with it then you will probably have some leftovers. Double the recipe if you are having guests.
Oh yeah, and here's Charlotte (almost two years old) getting ready to cut out some SERIOUS Christmas cookies. Yes, she's not making Chicken a la Niki just yet, but I have high hopes for the future.

Josh's Lentil Soup
This is a recipe my husband Josh wrote up in college - he was such an earnest young hippie back then! It's super easy, and super delicious. This recipe makes a pretty big pot of soup, so we end up enjoying it for several meals. We like to buy a loaf of whole wheat crusty bread and put a couple of slices on the bottom of the bowl, then ladle some soup over it and top the whole thing with some shredded cheese. It's tasty and very filling.
This soup requires very little prep time, but needs a little more time to cook, so you can throw everything in the pot while the baby naps and it should be ready in time for dinner.
2 cups lentils
1/2 cup chopped onion
1/2 cup chopped celery
1/4 cup chopped carrots
1 clove garlic, minced
salt
pepper
1/2 teaspoon oregano (dried)
16 oz can tomatoes (I use crushed or diced.)
2 tablespoons wine vinegar
Wash lentils, drain and place in soup pot. Add 8 cups of water and remaining ingredients, except tomatoes and vinegar. Cover and simmer 1-1/2 hours. Add tomatoes and vinegar. Simmer, covered, 30 minutes longer.
Homemade Press-Pot Cafe Au Lait
Starbucks calls them Mistos. Most everyone else calls them Au Laits. They're half coffee and half steamed milk, and I love them. The steamed milk is sweet enough so you don't have to add sugar, and if you use non-fat milk, they're pretty healthy! (Since I got pregnant, I've been making them with decaf coffee.)
To make this warm and tasty pick-me-up, you will need:
- Ground coffee (or you can use whole beans if you want to grind them yourself)
- Milk (I use non-fat, but you can use what you want)
- A way to boil water (we have an electric kettle that works beautifully)
- A small press pot
- A 700w microwave
- A mug
- A spoon (any old one will do)
(Don't you all love how thorough I'm being? I get so frustrated when recipes leave out important details!)
This recipe makes one large mug of warm and cozy tastiness.
Start the water heating.
Put one spoon of coffee in the small press pot.
Fill a big mug halfway with milk.
When the water is close to boiling (the sound gets lower) fill the press pot halfway, give it a stir, and put the top on.
Put the mug in the microwave and heat it for approximately 2.5 minutes.
When the microwave is done, press the coffee and pour into the mug.
Keep away from baby and enjoy!
Fancy-Pants Chocolate Croissants
1 bag chocolate chips
1 package crescent rolls (the kind that come in a tube)
Unroll dough from tube. Separate each crescent roll triangle along the perforated edges. Place lots of chocolate chips at the wide end of the dough triangle. Then roll up into crescent shape (directions on package). Cook according to package directions.
And . . . BOOYA! You have just made a delicate french pastry filled with chocolate.
Do not panic. This child is NOT making this recipe. Nope, this child is making floury 'goo'. Um . . . it was an accident . . . (NOT MY FAULT)

Subscribe to:
Posts (Atom)