Tuesday, December 20, 2011

Chocolate Cookie Sandwiches with Coffee Creme Filling


For you, Stephanie:)

CHOCOLATE COOKIE SANDWICHES with COFFEE CREME FILLING

I used a little less flour and baking powder to get a crisper cookie, then (once cooled) frosted bottom with frosting and stuck another to it, bottom to bottom. Filling is just frosting thinned with very strong coffee instead of milk. I grind coffee and add a small amount of hot water, then press liquid out- max flavor w/minimum liquid. The smaller cookie, the better, IMO.

  • 2 cups all-purpose flour
  • 1/2 cup unsweetened cocoa (or dark cocoa)
  • 1 teaspoon baking powder
  • 1/4 teaspoon salt
  • 8 ounces butter (2 sticks), softened
  • 1 cup brown sugar, firmly packed
  • 2/3 cup granulated sugar
  • 2 large eggs
  • 1 teaspoon vanilla extract (not imitation!)

  • Preparation:

  • Sift together the flour, cocoa, baking powder, and salt. Set aside.
  • Cream butter and sugars until light and fluffy. Beat in eggs, one at a time, beating after each addition. Beat in vanilla.

  • On low speed, beat in flour mixture a little at a time, until well blended and smooth.

  • Drop chocolate cookie dough onto greased baking sheets by rounded tablespoons, about 2 inches apart. Bake at 350° for 12 to 15 minutes, or until set, a little longer for a crisper cookie.

  • Cool on pans on rack for about 5 minutes; transfer chocolate cookies to rack to cool completely.

Monday, November 14, 2011

DANGER: Chocolate chip cookies with sea salt

Don't make these if you have a taste for both chocolate and salt and don't want to gain 10 pounds by the end of the week. I love nothing more than mixing salty and sweet -- especially if the sweet is chocolate -- therefore I will never be making these ever again unless I suddenly develop much better self control. Corey and I inhaled these this weekend in some sort of a race to see who was more of a glutton. It got ugly. We both lost, I guess.

But enough self-deprication. I got this recipe from a really awesome book called Mom's Big Book of Cookies (a gift from my mother-in-law). I love this cookbook for one huge reason in addition to the awesomeness of the recipes -- it is spiral bound and actually stays open flat on the counter while I'm cooking! I have a cookbook holder, but it really only works well for a narrow range of book size. Now I just have to keep my son's grubby mitts off the book while I'm baking. The gorgeous color photos of the cookies are irresistible to him and he is bound and determined to push a chair up to the counter and spirit the book away for reasons known only to him.

CHOCOLATE CHIP COOKIES WITH SEA SALT

2 1/4 cups flour
1 tsp baking soda
1/4 tsp kosher salt
1 cup (2 sticks) unsalted butter, melted and cooled slightly
1 cup firmly packed light brown sugar
1/2 cup granulated sugar
2 large eggs
1 tsp pure vanilla extract
2 cups semisweet chocolate chips
2 tbsp medium grain (not coarse) sea salt

1. Preheat oven to 375 degrees.

2. Combine the flour, baking soda, and salt in a medium-size mixing bowl.

3. Cream the cooled melted butter and sugars together in a large mixing bowl with a wooden spoon* until smooth. Add the eggs and vanilla extract and beat until smooth. Stir in the flour mixture until just incorporated. Stir in the chocolate chips.

4. Place the bowl in the refrigerator for 10 minutes (or up to 6 hours) to let the dough firm up.**

5. Drop the dough by heaping tablespoonfuls*** onto ungreased baking sheets, leaving about 3 inches between each cookie. Sprinkle each cookie with 1/8 teaspoon sea salt.****

6. Bake the cookies until golden around the edges but still soft on top, about 9 to 11 minutes. Let the cookies stand on the baking sheet for a few minutes, then remove them with a metal spatula to a wire rack to cool completely. The cookies will keep at room temperature in an airtight container for 2 to 3 days (unless you are like me and Corey, in which case the cookies won't last in the house for more than 24 hours, tops).


* This book is very particular about some things, like mixing with a wooden spoon and letting eggs warm to room temperature before mixing them in. I have made recipes out of the book before with straight-from-the-fridge eggs and haven't noticed the end result compromised in any way, but I'm sure the author would disagree. I actually did use a wooden spoon and mixed the butter and sugars by hand because it's so darn easy with melted butter.

** I have never heard of this step for anything other than rolled-dough cookies so I humored the author and did it. I thought it was kind of silly though and probably wouldn't do it again. I did put the bowl back in the fridge in between batches, but mostly to keep myself from consuming large quantities of cookie dough and spoiling my appetite for the finished product.

*** Does anyone actually ever follow this direction and make cookies that ridiculously small? I probably made my cookies twice this size and they baked perfectly in the same amount of time specified by the recipe. If you're really on the ball and bake a test batch of only two or three cookies to start with (like my mother does), you can test this.

**** Or just shake on a decent amount and laugh at the cookbook author for thinking you were anal enough to actually measure out such a tiny amount enough times to make several dozen cookies.

Saturday, November 12, 2011

Banana Chocolate Chip Bars: Righting Wrongs

Wrong #1: How have I never posted this recipe on this blog?!?  Banana Chocolate Chip Bars, found in my favorite cookbook of all time (Better Homes and Garden), are my signature baked goods.  I brought them to almost every potluck event when I was working, and I have made them so many times that the page in my cookbook is covered in tiny splatters of batter.  There's no telling how many people have made this recipe as a result of me e-mailing it, posting it on Facebook, and handing out the recipe at work.  Unless you don't like bananas in baked goods, you're going to love these bars.

Wrong #2: I made these wrong for years-- probably at least 7 or 8 years.  I didn't have the right size pan (a 15x10x1 baking pan, AKA a jelly roll pan, AKA a cookie sheet with sides), so I just made them in a 9x13 brownie pan.  I always wondered why I couldn't get the texture exactly right.  Then, one time when I was sending my sister the recipe, I thought more about the pan size.  I ran to Target, bought the right pan, and the next time I baked the BCCBs, they were HEAVENLY!

Without further ado, here is the recipe:

Banana Chocolate Chip Bars

Prep: 20 minutes
Bake: 25 minutes
Oven 350 degrees

3/4 cup butter or margarine, softened
2/3 cup granulated sugar
2/3 cup packed brown sugar
2 teaspoons baking powder
1/2 teaspoon salt
1 egg
1 cup mashed ripe bananas (2-3 medium)
1 teaspoon vanilla
2 cups all-purpose flour
1 cup (6 oz) semisweet chocolate chips

1) Grease a 15x10x1-inch baking pan; set aside.

2) In a medium mixing bowl, beat the butter or margarine with an electric mixer on medium to high speed for 30 seconds. Add the granulated sugar, brown sugar, baking powder, and salt; beat till combined. Beat in the egg, bananas, and vanilla till combined. Beat in flour till combined. Stir in chocolate chips.

3) Spread in the prepared baking pan. Bake in a 350 degree oven about 25 minutes or until golden. Cool on a wire rack. Cut into bars. Makes 36 bars.

Nutrition facts per bar: 117 calories, 5 grams total fat (2 grams saturated fat), 16 mg cholesterol, 92 mg sodium, 17 grams carbohydrates, 0 grams fiber, 1 gram protein.

***************

I have no picture of the banana chocolate chip bars, but here's a picture of my daughter (who loves to bake!) sampling the fruits of our labor (making brownies):


Saturday, October 8, 2011

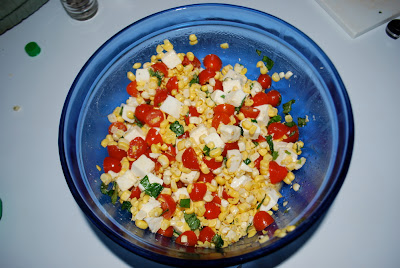
Mom's Italian Corn Salad

This salad is so good and pretty that you won't ever bring anything else along to a potluck. I brought this to my friend, Kym's house last weekend and got rave reviews. I got the recipe from my mom, and goodness knows where she got it. The original recipe called for balsamic vinegar. I used that when I made it last weekend, but this weekend I wanted to try it with white wine vinegar instead (I'm not a huge fan of balsamic vinegar, and it stained the mozzarella in an unappealing way). It turned out great. I also added a touch of lime juice because I think everything tastes better with lime juice. Except for cereal, I guess. Here is the recipe with all of my alterations.


MOM'S ITALIAN CORN SALAD

2 ears of corn, cut from the cob*
1 pint cherry tomatoes, halved
4 oz. fresh mozzarella cheese, cubed
1/3 cup coarsely chopped fresh basil leaves
5 tbs. extra virgin olive oil
2 tbs. white wine vinegar
sea salt (to taste)
black pepper (to taste)
lime juice (to taste -- maybe about a teaspoon or two)

1. Combine corn, tomatoes, mozzarella, and basil in a bowl.

2. In another bowl, whisk together the olive oil, vinegar, salt, and pepper. Pour the dressing over the salad and toss gently.

3. Refrigerate for 30 minutes, then add more salt and pepper if necessary before serving.


* I used this super hilarious OXO Good Grips Corn Stripper. My mom bought it for my husband because she knows he loves his corn cut OFF the cob.

Thursday, October 6, 2011

Really Freakin' Good Apple Pie (and crust)


Ingredients

  • 1/2 cup unsalted butter
  • 3 tablespoons all-purpose flour
  • 1/4 cup water
  • 1/2 cup white sugar
  • 1/2 cup packed brown sugar
  • about 8 apples - peeled, cored and sliced

Directions

  1. Prepare the apples.
  2. Preheat oven to 425 degrees. Melt the butter in a saucepan. Stir in flour to form a paste. Add water, white sugar and brown sugar, and bring to a boil. Reduce temperature and let simmer.
  3. Place the bottom crust in your pan. Fill with apples, mounded slightly. Gently pour the sugar and butter liquid over the crust - save a little bit to put on top of the crust. Pour slowly so that it does not run off.
  4. Do the lattice crust and pour or brush remaining liquid over crust.
  5. Bake 15 minutes in oven. Reduce the temperature to 350 degrees. Continue baking for 35 to 45 minutes, until apples are soft.

I know, you may not want to make your own crust. But someday when you are feeling like a Domestic Goddess, here's a good/easy recipe:

1 c. butter
2 c. flour
1/3 c. milk
1 tbsp. vinegar

Cut butter into flour with pastry blender. Put vinegar in milk, add to flour mixture. Roll out half and fit into pie pan, then save the other half for the lattice crust.


Hank's Butternut Squash Soup

I got this recipe from a high school friend about 2 years ago. I finally tried it this past weekend. IT WAS AWESOME. And it was a pretty color. :)

Ingredients:

4 C Chicken Stock
1 C Water
1 C Half n Half (Don’t worry, it’s a big pot)
1 large Butternut Squash
1 tsp Yellow Curry Powder (Adjust to taste - I use closer to 2 tsp)
1 Onion
1 large Carrot, chopped
1 Potato
1 C Sour Cream
Sat & Pepper to Taste


Directions:
1. Peal and Cube Potato and Butter Nut Squash while bringing Stock and Water to a boil in a large pot (seriously, it needs to be large).
2. Add Carrots, Onion, Potato, and Squash and cook until tender.
3.Using a slotted spoon remove from stock and transfer to blender with a little stock and blend until smooth.
4. Return mixture to pot and add remaining ingredients.
5. Simmer stirring occasionally for approximately 1 hour to allow for flavors to blend and soup to thicken.

More Lentil Soup!

3 carrots, chopped
a couple potatoes, chopped (whatever you have around)
1 onion, chopped
3 cloves garlic, pressed
8 cups water or vegetable broth
2 cups lentils, rinsed (I used red and brown)

Throw it all in the crock pot. Cook on low for about 8 - 10 hours or on high for 6 hours.

About 10 minutes before serving put in 1.5 teaspoons of balsamic vinegar and season with salt and pepper to taste.
Serve with feta cheese on top.


Friday, September 2, 2011

Avocado and tomato salad

Maybe this isn't a great recipe to post this late in the summer. I know good tomatoes and avocados are harder to find, but file this one away for next summer if you're not willing to use hothouse or out of season produce. I made this for my mom, aunt, and cousins a couple of weeks ago and everyone loved it. I modified a recipe I found in a book whose title rhymes with "Looking for Mummies". I bought that book a few years back but never have used it to its full potential. After finding this salad in it, I think I need to sacrifice a bit of my precious evening sit-like-a-zombie-in-front-of-the-television time and make plans to try a few more recipes.

Avocado and Tomato Salad

2 ripe avocados (not too squishy though!)
4 ripe plum tomatoes
2 hard-boiled eggs (whites only), peeled and quartered
1/2 very small red onion, very thinly sliced and then roughly chopped
1/4 cup coarsely chopped cilantro
2 large cloves garlic, finely chopped
6 tbsp olive oil
2 tbsp red wine vinegar
1/2 tsp ground cumin
salt and pepper to taste

1. Halve and pit the avocados. Peel away the skin and cut each half into 4 lengthwise slices and then across into large cubes.

2. Core the tomatoes and cut them into 1-inch cubes.

3. Toss all ingredients EXCEPT the avocados together and keep chilled until time to serve. Add the avocados at the last minute and very gently stir them in.

Monday, August 8, 2011

Botio's Carrot Cake

Ok, so I haven't made this recipe yet. But it comes from a trusted source. In fact, it comes from the Master Chef and God of Cooking: Botio! He can make anything taste good.

Botio's Carrot Cake

2 c sifted all-purpose flour
2 tsp baking soda
2 tsp cinnamon
2 c sugar
1 tsp vanilla
3 c grated carrots
1 ½ c vegetable oil
4 eggs
1 c chopped nuts

Icing:
1 8 oz softened cream cheese
¾ c softened butter
1 16 oz box confection sugar
1 c chopped nuts
1 tsp vanilla

Preheat oven to 325. Combine flour, soda, and cinnamon. Set aside. Combine all other cake ingredients, and then add dry ingredients. Stir with electric mixer at medium for about 3 minutes. Grease and flour 2 9-inch pans. Bake 40-50 minutes. Check with toothpick to see when it is done. Your baking time may vary.

Cool thoroughly* before icing. For icing combine and beat thoroughly with electric mixer.

*I put put the cooled cake in the freezer and frost it later. This makes it very easy to frost and handle.

Saturday, August 6, 2011

Brown Sauce for Stir Fry

  • The original recipe was found here. It's a double recipe so it makes enough for two meals or lots of extra dipping. We didn't have everything the recipe called for so we made some substitutions which are in parenthesis.
  • 2/3 cup soy sauce
    1/2 cup chicken broth
    1/3 cup rice wine (we used apple juice)
    3 1/2 tablespoons sugar
    1 tablespoon sesame oil
    1/4 teaspoon white pepper (we used black pepper)
    2 tablespoons cooking oil
    1 tablespoon minced garlic
    1 tablespoon minced ginger
    2 tablespoons cornstarch (we used flour)
    1/4 cup water
  • Directions:
  • 1. In a bowl, combine soy sauce, broth, rice wine, sugar, sesame oil and white pepper.
    2.Dissolve the cornstarch in 1/4 cup water.
    3.Heat a pan over high heat; add the cooking oil, swirling to coat; add the garlic and ginger; cook, stirring, until fragrant, about 15 seconds.
    4. Add the soy sauce mixture; bring to a boil.
    5. Reduce heat to medium and cook for 1 minute.
    6. Add the cornstarch solution and cook, stirring, until the sauce boils and thickens
  • This sauce was AWESOME. Or as Zoey said, "This is the best YUM ever!"


Friday, July 8, 2011

Mounds Cake!!!

I made this for my mom's birthday. She declared it to be her MOST FAVORITE CAKE IN THE WHOLE WORLD. Not that she's biased to my cooking or anything.

Ingredients:
1 box devil's food cake mix (and what you need to make it)
1-2 cans coco lopez cream of coconut (depending on how coconut-y you like it)
1 container cool whip
shredded coconut - about 3/4 of a cup or however much you want
1 king size chocolate bar - shavings

Directions:
prepare and bake cake in a 9 x 13 pan.
remove from oven, poke holes all over.
pour coconut milk over cake and then cool.
frost with cool whip then cover with shredded coconut.
garnish with shaved chocolate.
serve or refrigerate.

Monday, July 4, 2011

Grilled Romaine Salad

It sounds downright bizarre -- grilling lettuce? Putting half a heart of romaine directly on the grill? Really? When my sister-in-law told me about it, I thought she was nuts. I searched online and found bunches of recipes with rave reviews. There are many many different variations on this, and a quick search of "grilled romaine salad" will get you all sorts of ideas on how to dress it up. Here's a basic recipe that makes enough for two people.

GRILLED ROMAINE SALAD

1 heart of romaine lettuce
Extra-virgin olive oil
Sea salt and/or lemon juice

1. Preheat a grill to medium high.

2. Rinse and pat dry the lettuce. Cut it in half lengthwise. Brush the entire surface (the cut side and the uncut side) of the lettuce lightly with the olive oil.

3. Place the lettuce on the grill and turn it over every minute or so for about 4-5 minutes total. The lettuce should be a little charred, but not burnt. Some of the leaves at the end will be a little wilted.

4. Slice across the width of the lettuce and put it on a plate. Sprinkle with just a tiny bit of sea salt (and/or drizzle a little lemon juice over the leaves) and serve warm.

We grilled up some chicken breasts that were only sprinkled with a little bit of seasoned salt and put slices of that on top of the salad along with some shaved parmesan-romano cheese curls. It was EXCELLENT. The salad didn't need any sort of dressing at all. The original recipe we followed had instructions for a citrus vinaigrette to put on top, but I think that would have hidden the yummy smoky flavor. This would also be excellent with grilled steak, shrimp, or pork, I bet. Some recipes called for grilled vegetables to be added as well. Ooh -- I bet grilled corn on the cob would be delicious to cut off and sprinkle on top! I'm all pumped to try this again with all sorts of different variations.

Here is the salad before I devoured it in about 20 seconds flat:


Here is the lovely man who did the vast majority of the cooking of this meal:


Aaaaand here are my knucklehead children who wouldn't even try a bite of the salad. I think Petey ate a bit of the chicken, but I can't be entirely sure. I was too busy exclaiming over our culinary brilliance and stuffing my face to notice what he was doing.


Saturday, April 30, 2011

Garden Rice Salad

I admit this recipe sounds odd. My mother-in-law is always trying to come up with recipes for foods I will actually eat when I'm at her house and she knows that wild rice and cucumbers are high on my list of favorites. Who knows where she found this, but it was amazing. I made it with peanuts for a picnic we're having tonight that includes vegetarians, but it is also yummy with chicken. (Erin -- I know you're going to barf when you see wild rice as one of the ingredients, but I bet you could substitute plain white rice or even brown rice.)

GARDEN RICE SALAD

Lettuce*
1 package/box long grain & wild rice mix
1/2 cup mayonnaise
1/4 cup plain yogurt
1 cup sliced celery
1 cup quartered cherry/grape tomatoes
1/2 cup diced cucumbers (I peeled it first.)
2 tablespoons chopped parsley
1/4 cup dry roasted peanuts OR 1/2 cup cooked cubed chicken
Seasoned salt and pepper to taste

All you have to do is cook the rice and cool it down. You could even do this the day before if you are as organized as my mother-in-law. If you're like me, you make it at the last possible minute and then chill it in the freezer to help speed the cooling process along. Anyway, mix all the ingredients together in one large bowl and viola! Chill it until you serve it.

------------------------------------------------------------------
* I used sliced hearts of romaine, but the recipe didn't specify type. The recipe also doesn't specify how much lettuce to use, so I just used one romaine heart thing and it turned out great.

Sunday, April 17, 2011

No-bake Nap Cookies

I made these while my kids napped this afternoon, hence the name. I saw a recipe on the back of pomegranate-flavored Craisins (my 16-month-old, Peter, is addicted to them) and modified the recipe a little to match my (1) laziness, (2) supplies, and (3) older child's picky eating habits. You see, while Peter is addicted to pomegranate-flavored Craisins, my three-year-old, Charlotte, will only eat the cherry-flavored kind. We should probably buy stock in Ocean Spray at this point. Anyway, here is the recipe with my modifications:


NO-BAKE NAP COOKIES

1/4 cup honey
1/4 cup heavy cream
1 12-ounce package of white chocolate baking chips (I could only find 11-ounce packages!)
3 cups chow mein noodles (FYI - a 6 oz. package is about 3 cups)
1 cup cherry-flavored Craisins
1 cup granola cereal (nothing this plain existed at Publix, so I bought vanilla)
1/2 cup slivered almonds, toasted (though I didn't toast them)

1. Line 2 large baking sheets with waxed paper. (I only had cling wrap, and that worked just fine.)

2. Combine honey and cream in a 2-quart saucepan. Cook over medium-low heat until bubbly.

3. Add chips; cook, stirring until chips are melted and mixture is smooth.

4. Combine noodles, Craisins, granola, and almonds in a large bowl. Believe me when I say a LARGE bowl.

5. Pour cream mixture over noodle mixture. Stir until mixed and coated. I dove right in with my hands when the silicone spatula proved worthless. It was kind of a calamity, so don't make this with your toddler unless you have a really high tolerance for messes.

6. Drop by heaping tablespoonfuls onto the baking sheets. Let stand until completely set. Store loosely covered. Makes 30 clusters. (Well, I only got 27, but my tablespoonfuls were heaped awfully high and there had to have been at least one or two cookies worth of mixture stuck to me after I finished hand-mixing them.)

I threw them into the fridge to make sure they cooled and set in time to take them to dinner at our friends' house tonight. Based on the portions I sampled during their creation, they are AWESOME. I bet the kids will love them, but then again nothing is ever certain with those goofballs. Cross your fingers. At the very least, Charlotte can pick out the Craisins and eat them. Here is a shot of the cookies before I stuck them in the fridge. Note the baby monitor next to the baking sheets!


Saturday, February 26, 2011

Peter's 1st Cooking Adventure -- Banana Bread!

My 14-month-old son, Peter, has recently learned to climb up on the chair my almost-three-year-old daughter, Charlotte, stands on when she "helps" me cook. He insisted on standing there while I made banana bread this morning using Erin's recipe that she posted ages and ages ago.

The bread is still in the oven, but I'm going to declare this a "success" event because Peter and I had so much fun cooking. No, he didn't really help, and it was kind of awkward because I had to use only the part of the island counter out of the reach of his chubby little arms. He was enthralled by the mixer though, and he looked super cute cuddling the plush dog puppet* (given to his big sister by Joslyne's parents at Halloween in 2009). I'm 99.9% sure Peter will wolf down the banana bread when it comes out of the oven, but his sister, of course, will refuse because she is the pickiest eater alive. Sigh.

Here is Peter inspecting the overripe bananas we used. You get a much better flavor from the bread if you use nasty, stinky bananas -- trust me!


And here is Peter cuddling with the dog puppet. He may not have a permanent security item, pacifier, or thumb to soothe him, but he really likes cuddling with stuffed animals. And he adores baked goods. I have a feeling we will be eating this banana bread while cuddling some stuffed animals together later!


*This dog "barks" when you squeeze down on its mouth. I learned last night NOT to put Peter to sleep in his crib with said barking dog because when he rolls over on top of it in the middle of the night, the resulting "bark" heard over the baby monitor wakes me up out of a sound sleep and kind of freaks me out. Lesson learned.

Sunday, January 30, 2011

Demetri's Pad Thai

All hail my Hot Husband -- For he has made Pad Thai!!!!!!!!!!


We got the original recipe here, but Demetri altered it and it turned out AMAZING. As good as a restaurant! Also, I know this recipe looks long (10 steps! Gasp!) but it's not as hard as it looks.

1 box regular (or GF) pasta - linguini-width (or fried Pad Thai rice noodles)
2 eggs (or 1/2 cup soft tofu)
4 cloves garlic, minced
1/4 cup red onion, finely chopped
3/4 cup cabbage, roughly chopped (optional)
additional veggies of your choice (we* used sugar peas and baby corn)
2 cups bean sprouts
2 green onions, sliced
1/3 cup fresh coriander/cilantro (we used cilantro)

PAD THAI SAUCE:
3/4 Tbsp. tamarind paste (available at Asian/East Indian food stores)
1/4 cup hot water
3 1/2 Tbsp. soy sauce
1/2 to 2 tsp. chili sauce (to taste), (we used 1/2 tsp)
3 Tbsp. brown sugar
1 Tbsp. peanut butter

OTHER:
3-4 Tbsp. oil for stir-frying
2-3 Tbsp. vegetable or faux chicken stock

Preparation:
1. Bring a pot of water to and cook noodles 2 minutes less than package direction (noodles will finish cooking in frying pan)
2. Dissolve the tamarind paste in the hot water. Add the other pad thai sauce ingredients and stir well to dissolve the sugar. Don't skimp on the sugar (you need it to balance the sourness of the tarmaind). Reserve.
3. Place large frying pan over medium-high heat. Add 1-2 Tbsp. oil plus the garlic and red onion. Stir-fry 1 minute to release the fragrance.
4. Add the cabbage and the stock. Stir-fry 2 minutes.
5. Push ingredients aside and add 1/2 Tbsp. more oil to the center of the wok/pan. Add the eggs (if using) and stir-fry briefly to scramble them.
6. Add additional veggies if using.
7. Push eggs aside and add a little more oil to the middle of the wok/pan. Now add the drained noodles (and tofu, if using) and 1/3 of the sauce. Stir-fry everything together for 1 minute using 2 utensils and a tossing motion.
8. Add a little more sauce and continue stir-frying in the same way for 1-2 more minutes, or until the noodles begin to soften and become sticky. Reduce heat to medium if noodles begin to stick and burn.
9. Add the bean sprouts plus the remaining sauce. Stir-fry to incorporate everything together for 1-3 more minutes, or until noodles are done. Noodles are cooked to perfection when they are soft but still deliciously chewy and a little bit sticky.
10. To serve, scoop noodles onto a serving platter. Sprinkle with the green onion, coriander/cilantro.

* and by 'we' I mean Demetri

Chop Suey - American Style!

I got this recipe from the blog, A Year of Slow Cooking. This woman cooked in her crock pot every day . . . for a year! And that's, you know, TOTALLY AWESOME. I altered her recipe slightly (left out the bacon and used ground turkey instead of beef). This recipe was not only delicious, but it was the perfect comfort meal for mid-winter. It's also wicked kid friendly!

1 pound lean ground turkey, browned and drained
1 large onion, diced
1 green bell pepper, seeded and diced
1 (14.5-ounce) can diced tomatoes
1 can water (empty tomato can)
6 garlic cloves, chopped
1 jar prepared pasta sauce (I used Classico Marinar with Plum Tomatoes)
1 (16-ounce) package pasta of your choice (I used gluten free brown rice rotini pasta)
1 cup shredded cheddar cheese (optional)

Directions:
1. In a large skillet, brown turkey the and onion all together until the meat is no longer pink. Drain well and put in crock pot.
2. Add everything else into the pot except for the pasta and cheese.
3. Stir to combine. Cover and cook on low for 6 to 8 hours, or high for about 4* hours. Stir in the raw pasta and cook on high for approximately 20 - 30 minutes, or until pasta is bite-tender.

*Mine was totally done, complete with pasta, in 4 hours

Sunday, January 16, 2011

Chicken, Artichokes, & Mushrooms in Wine Sauce

Yet another recipe purloined (and slightly modified) from the Better Homes & Gardens Cook Book. Erin and I would get sued for infringement if it weren't for the fact that recipes cannot be copyrighted. Or so I remember from my copyright class that I took exactly 10 years ago. Not much has changed in the law since then, has it? Oh it has? Well, let's just hope I'm still right about the recipes.

ANYWAY, I broke the cardinal rule (or is it Murphy's Law?) that says you must NOT make a recipe you have never tried before when having company over, or else the recipe is sure to totally bomb. I had chef-block and couldn't think of a recipe to make for Katie and Sean last weekend, so I actually busted out the cook books to search for one. My husband says I'm a good cook who has TERRIBLE taste in recipes (thanks, butthead), but in this case I scored. This turned out really yummy, although I will caution you against buying chicken breasts that are too thick because they take waaaaaay longer to cook than the recipe instructs. Thank goodness for patient guests and husbands who will distract hungry children while you stress about how long the chicken is taking to cook.

Chicken, Artichokes, & Mushrooms in Wine Sauce

Start to finish: 30 minutes (unless you buy thick chicken, then it's more like 45 minutes)

1/4 cup all-purpose flour
1/2 teaspoon dried sage, crushed*
1/4 teaspoon sea salt
1/8 teaspoon black pepper
4 skinless, boneless chicken breast halves**
2 tablespoons cooking oil
2 cups sliced fresh mushrooms
1 can artichoke hearts, quartered (drained)***
1 tablespoon butter or margarine
1/3 cup dry white wine****
1/3 cup chicken broth
1/8 teaspoon sea salt
2 tablespoons grated Parmesan or Romano cheese*****
2 tablespoons snipped fresh parsley (I considered this optional.)

1. In a shallow dish, stir together flour, sage, 1/4 teaspoon sea salt, and pepper. Reserve 1 tablespoon of the flour mixture. Coat chicken with remaining flour mixture.

2. In a large skillet (I used an electric skillet), cook chicken in hot oil over medium high heat for 8 to 10 minutes. or until no longer pink, turning once. Remove chicken from skillet; cover and keep warm. Drain off any excess oil in skillet.

3. In the same skillet, cook mushrooms and artichoke hearts in hot butter/margarine over medium heat for 3 minutes or until artichokes and mushrooms are tender.

4. In a small bowl stir together reserved flour mixture, wine, broth, and 1/8 teaspoon salt until smooth. Add wine mixture to skillet. Cook and stir until thick and bubbly, the cook for 1 minute more. Pour sauce over chicken. Sprinkle with cheese and parsley.

--------------------------------------------------

* Does it come any other way than crushed?
** Was this my problem? Did I buy whole skinless, boneless chicken breasts? I must investigate next time I go back to the grocery store. I am a bit worried though, because last time I was there 90% of the poultry case was empty with absolutely no explanation. Was there a run on ground turkey? Did the Foster Farms chickens finally convince their brethren to escape? What is going on here in Franklin, TN?
*** The recipe calls for frozen artichoke hearts, which I was unable to find for some reason. Instead, I used canned, but I didn't write down how many ounces were in the can before I tossed it. The can I used probably had about 10 or 12 ounces of artichoke hearts in it, I think. When I'm investigating the Great Missing Poultry Episode of 2011, I will stop by the canned veggie aisle and confirm.
**** I used boxed wine that had been in our fridge for probably close to six months, but it tasted just fine! Honestly, the end result didn't have a very strong wine taste, so you could probably just substitute chicken broth for the wine and call it a day.
***** I know I'm getting a little ridiculous with the asterisks, but I just had to share that for some weird reason, my father's family refers to grated Parmesan cheese as "stinky foot cheese". I blame my Grandpa Chuck, who has a habit of calling things by weird names, overusing the word "incidentally", and adopting bizarre accents for no particular reason during otherwise normal conversation.

Thursday, January 13, 2011

Pesto-chicken penne casserole

This is one that I pulled out of my Freezer Meal cookbook---so it can be doubled and frozen, taken out when needed. I loved it, as did my family. It is ALMOST like Olive Garden at home. Really. Yum.

1/2 package penne pasta (8 oz. of a 16 oz box)
3 cups cooked chicken
2 cups shredded italian cheese blend
1 1/2 cups fresh baby spinach
8 oz. crushed tomatoes (half a can)
8 oz. Alfredo sauce (half a jar)
5 oz. prepared pesto (half a container)
3/4 cup 2 percent milk
1/4 cup seasoned breadcrumbs
1/4 cup Parmesan cheese
1/2 Tablespoon olive oil

1. Cook pasta according to package directions. Meanwhile, in a large bowl, combine the chicken, cheese blend, spinach, tomatoes, Alfredo sauce, pesto, and milk. Drain pasta and add chicken mixture, toss to coat.

2. Transfer to a greased 8 in square baking dish. In a small bowl, combine bread crumbs, Parmesan cheese, and oil. Sprinkle over casserole.

3. Cover and bake at 350 degrees for 40-45 minutes or until bubbly.


It really is good. And yes, it is a lot of "pre-made" sauces, but I'm okay with that--less work! Who has time to make homemade alfredo sauce and pesto?!

Marinated London Broil


So easy, and SO good!

Marinade-

1/2 C each of:
red wine vinegar
vegetable oil
soy sauce
1/2 tsp black pepper
4 cloves garlic, crushed

Combine all ingredients and pour into freezer bag. Score a London Broil (shallow cuts in a crisscross pattern on both sides.) Add meat to bag and refrigerate for a few hours or overnight. Grill on barbecue or under broiler until done. We like it medium rare, so about 3-4 minutes on each side. Will vary according to size. Slice thinly against the grain and devour.


Chocolate Peanut Butter Grahams

These are homemade Reese's. They're bars, so they're super fast to make. They also travel VERY well, and everyone seems to love them.

22 graham cracker squares, crushed.
(Do yourself a favor- buy the box of crumbs and use 1 1/2 cups.)
3 C powdered sugar
8 oz butter, melted (Yes, it's 2 sticks of butter. Get over it. It's CANDY)
1C creamy peanut butter
1 12 oz. bag of semi-sweet chocolate chips

Combine crumbs and powdered sugar. Stir in butter and peanut butter. Mix well and spread evenly in an ungreased 12x13 pan. Press firmly into an even layer. You can cover with plastic wrap if it's too sticky.

Place in fridge for 45 minutes.

Melt chocolate chips in the microwave on defrost, stirring frequently, until completely melted. Spread over peanut butter mixture and let firm up for at least 15 minutes before cutting into squares. They're rich, but delicious. Enjoy!

Lamb Koftas

These little lamb koftas by Annabel Karmel are super easy to make and are really delicious. My 2 year old devoured them, as did my husband which in my book means a win-win situation! I've doubled the suggested recipe here and added a few ideas of my own and it fed the three of us with enough for a light adult lunch or a toddler main meal left over.

1 small red onion, finely chopped
2 tbsp olive oil
2 garlic cloves, crushed
1 tsp ground cumin
1lb ground lamb
breadcrumbs from 2 slices of bread, crusts removed
1 tbsp chopped fresh mint
2 tsp clear honey
2 egg yolks
salt and pepper to season

1. Fry the onion in the olive oil on a medium heat for about 5 minutes until softened
2. Add the cumin and garlic and continue to fry for another minute.
3. Transfer onion mixture to a bowl and add all the remaining ingredients (see I told you it was easy!). Mix well.
4. Take generous tablespoon sized portions of the mixture (you can make bigger or smaller but you'll just need to adjust the cooking time) and form into sausage shapes - it'll make about 12-16 - and put onto a broiler sheet. Chill in the fridge for an hour or so (they work ok without being chilled but have a tendency to fall apart more easily).
5. Pre-heat the broiler to high and grill the koftas for 8-10 minutes, turning halfway, or until cooked through. They won't freeze, but will keep for a couple of days in the fridge and to heat through, just pop in the microwave for 30 seconds per kofta.

I served with a cold potato salad (new potatoes, enough greek yogurt to coat and a couple of tablespoons of chopped mint), spinach leaves, tomatoes and cucumber. Yum yum!!


Chicken Tikka Masala

This is my favorite Indian dish and, if I do say so myself, IT WAS AWESOME. In fact, it was as good as in a restaurant. A good restaurant.

Chicken Marinade:
1 cup yogurt (I also threw in about a quarter cup of sour cream for fun)
1 tablespoon lemon juice
2 teaspoons ground cumin
1 teaspoon ground cinnamon
2 teaspoons paprika
2 teaspoons freshly ground black pepper
1 tablespoon minced fresh ginger
1 teaspoons salt (optional)
3 boneless skinless chicken breasts, cut into bite-size pieces
several long skewers (I bought the wooden kind at the store and used about 10)

Sauce:
1 tablespoon butter
1 clove garlic, minced
2 teaspoons fresh poblano pepper, finely chopped (if you want serious spice use a whole jalapeno pepper instead)
2 teaspoons ground cumin
2 teaspoons paprika
1 (8 ounce) can tomato sauce
1 cup heavy cream
salt to taste
1/4 cup chopped fresh cilantro (if desired)

1. For marinade, in a large bowl, combine yogurt, lemon juice, teaspoons cumin, cinnamon, paprika, black pepper, ginger, and 1 teaspoons salt. Stir in chicken, cover, and refrigerate for 1 hour.
2. Preheat oven to broil. Cover grill with foil for easy clean up. Thread chicken onto skewers, and discard marinade. Grill until juices run clear, about 5 - 10 minutes on each side.
3. For sauce, melt butter in a large heavy skillet over medium heat. Saute garlic and poblano pepper for 1 minute. Season with 2 teaspoons cumin, paprika, and a dash of salt (if desired). Stir in tomato sauce and cream. Simmer on low heat until sauce thickens, about 20 minutes. Add grilled chicken, and simmer for 10 minutes. Transfer to a serving platter, garnish with fresh cilantro, and serve over rice.


Saturday, January 8, 2011

Macaroni-Cheese Puff

I found this recipe in the "all-time favorites" section of my Better Homes & Gardens cookbook, and it is so awesome! I hate pimiento, so I left it out, and my puff (kind of like a souffle) turned out the tiniest bit bland, but it was still fabulous enough that my husband, my 19 month-old daughter, and I all inhaled it. Does anyone have any ideas of a tasty ingredient that could be added to this souffle in lieu of pimiento? The only things I could come up with were bacon and corn.

It's not beautiful, but it's tasty!!


Prep: 30 minutes
Bake: 50 minutes
Oven: 325 degrees

Ingredients:
1/2 cup elbow macaroni (uncooked)
1 1/2 cups milk
6 oz American cheese slices, torn
3 Tbsp butter (use the salted kind)
3 eggs (to be separated)
1 cup bread crumbs (about 1 1/2 slices)
1/4 cup chopped pimiento (optional)
1 Tbsp snipped parsley (optional)
1 Tbsp finely chopped or minced onion
1/4 tsp cream of tartar

Directions:

1) In a small saucepan, cook macaroni according to package directions; drain and set aside.

2) Meanwhile, in a large saucepan, combine the milk, cheese, and butter. Cook and stir over low heat until cheese is melted. Remove from heat.

3) Separate the egg whites from the egg yolks, putting the egg yolks in a small bowl and the egg whites in the electric mixer's bowl. Beat the egg yolks. Stir about 1/2 cup of the hot cheese mixture into the egg yolks. Pour egg & cheese mixture into the saucepan with the rest of the hot cheese mixture and stir to combine.

4) Add the drained macaroni, bread crumbs, pimiento (optional), parsley (optional) and onion to the egg & cheese mixture in the saucepan. Set aside.

5) Beat the cream of tartar and egg whites with the whisk attachment for your electric mixer* until stiff peaks form (tips stand straight). Gently fold into macaroni mixture.

6) Pour mixture into an ungreased 1 1/2 quart souffle dish (or a 2 quart casserole dish).

7) Bake in a 325 degree oven for 50 minutes. Serve immediately.

*If you do not have an electric mixer, con someone else into beating the egg whites. This is a TON of work to do by hand!! And if you don't have a whisk attachment, I think the normal attachment will also work, but it might take longer. I could be wrong about this.